Overview
A Python framework for autonomous agent networks that handle task automation with multi-step reasoning.
Visit:
Key Features
versionhq is a Python framework designed for automating complex, multi-step tasks using autonomous agent networks.
Users can either configure their agents and network manually or allow the system to automatically manage the process based on provided task goals.
Agent Network
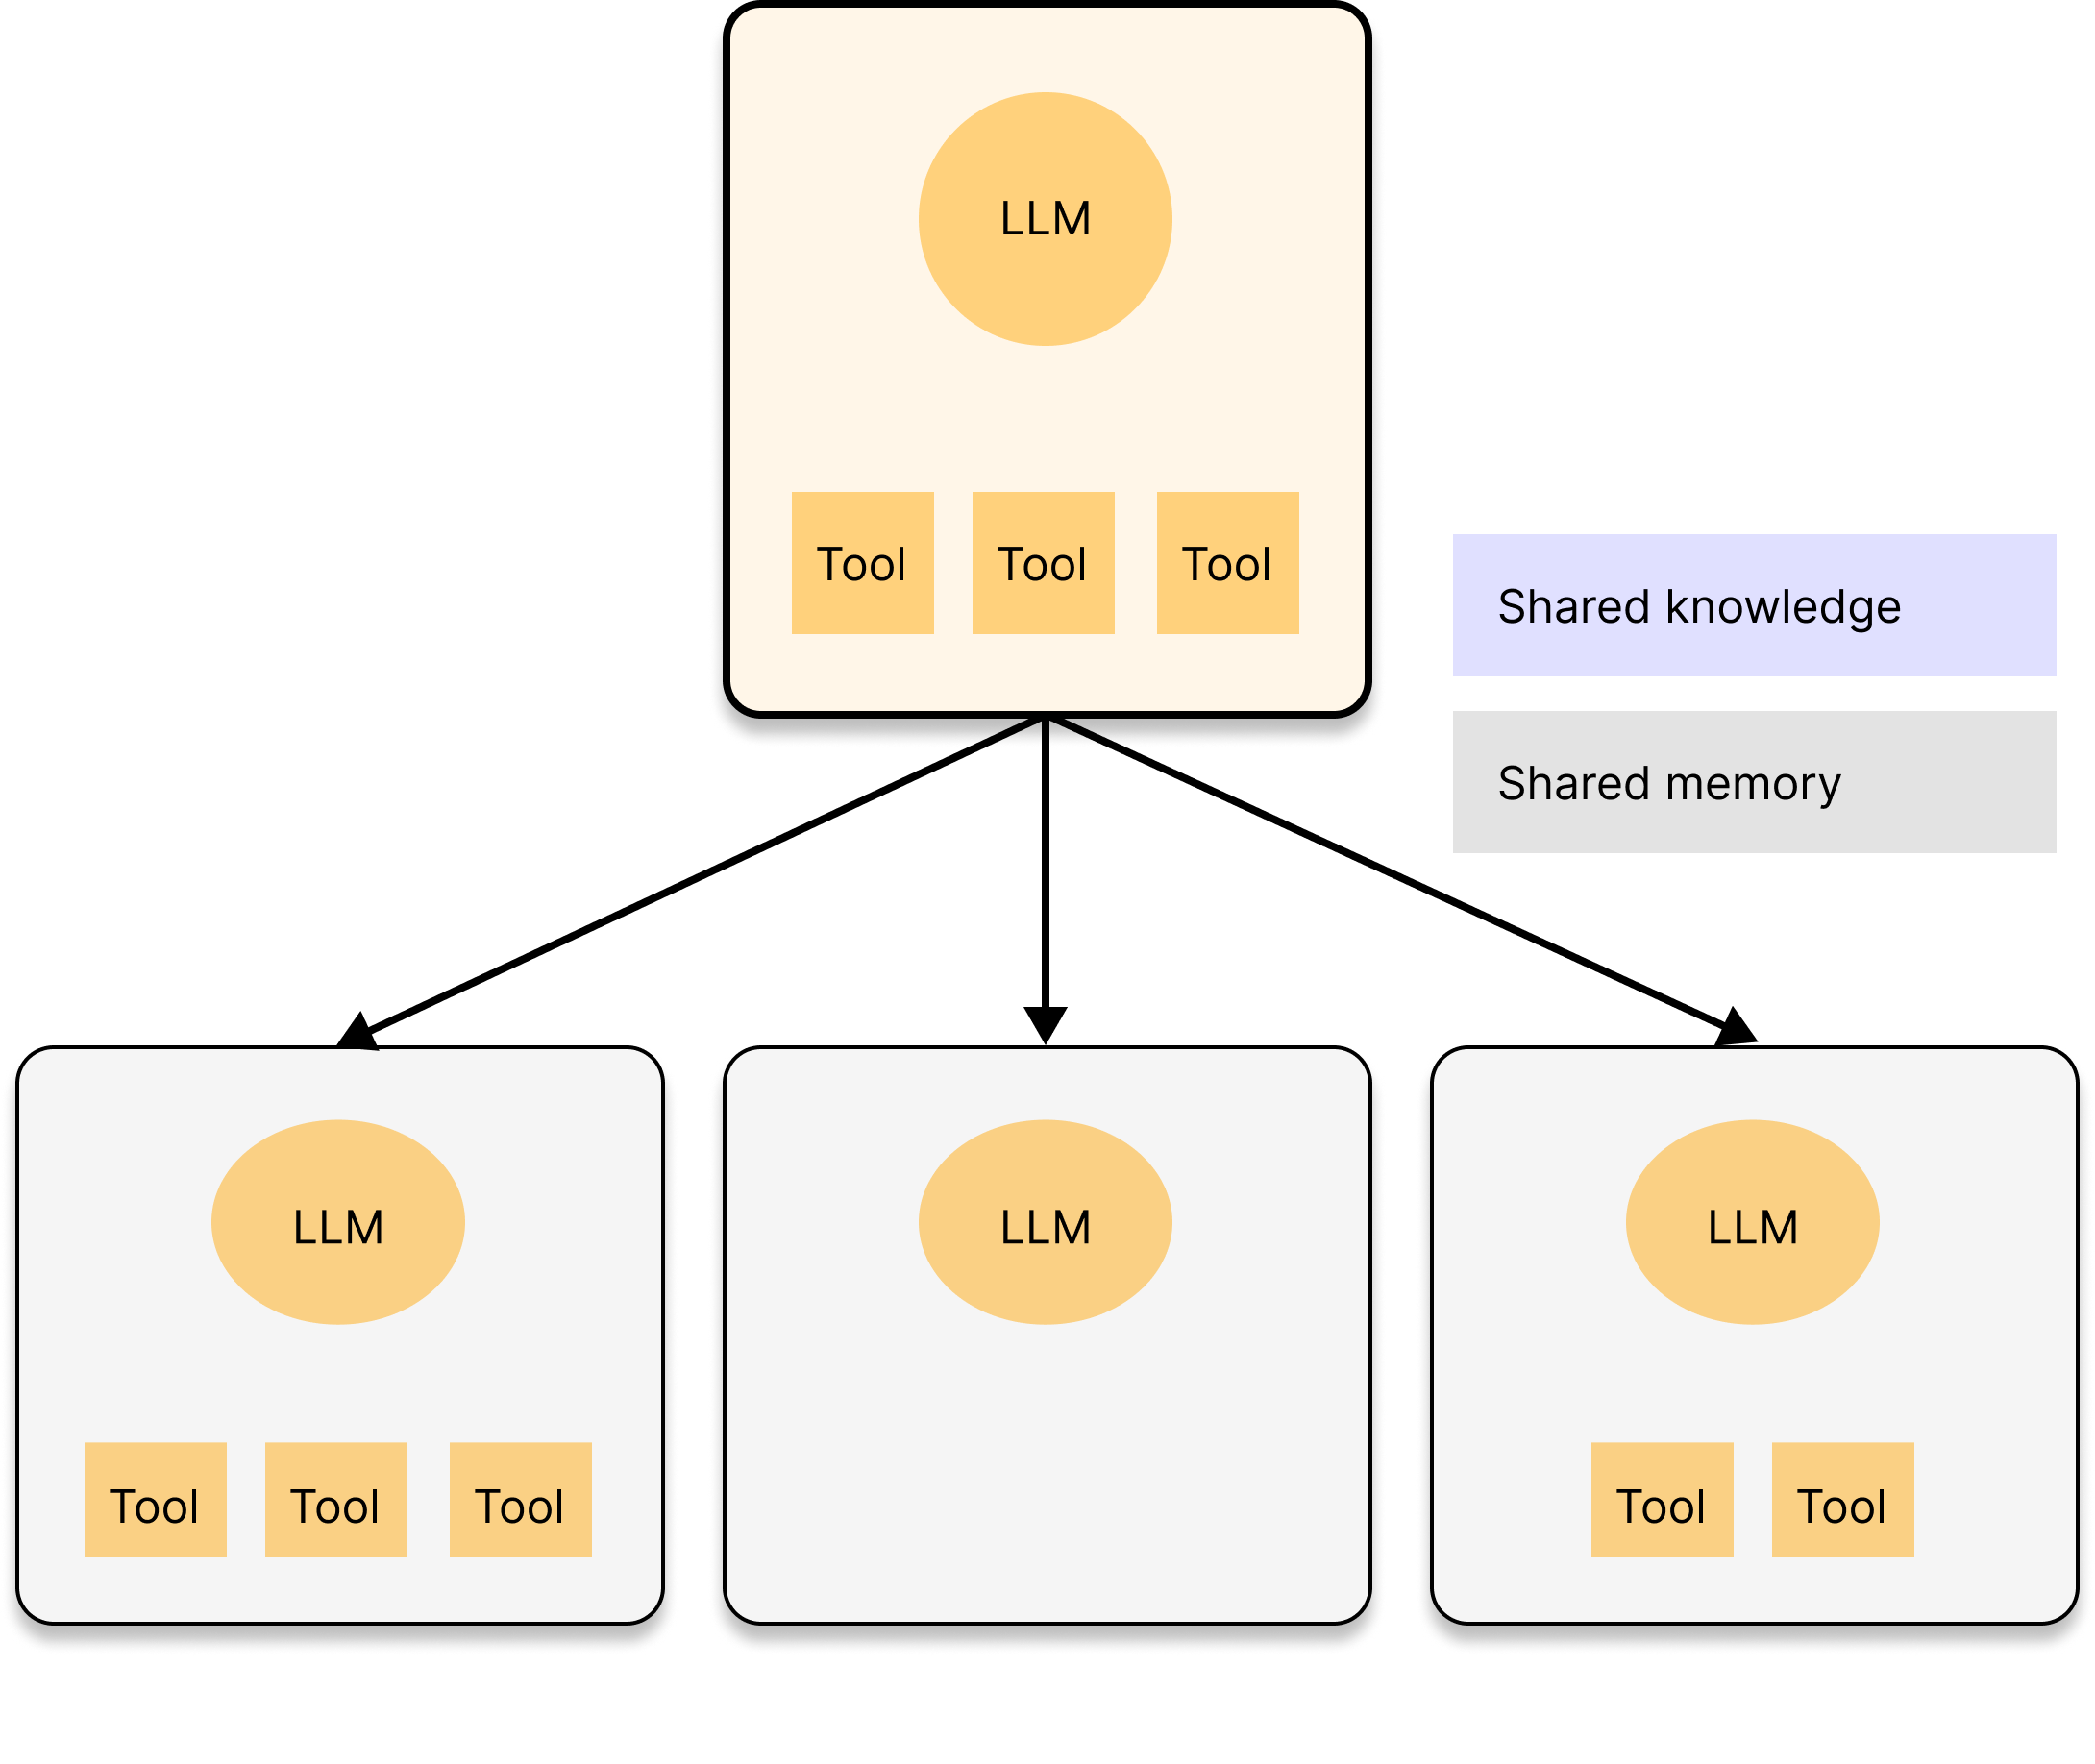
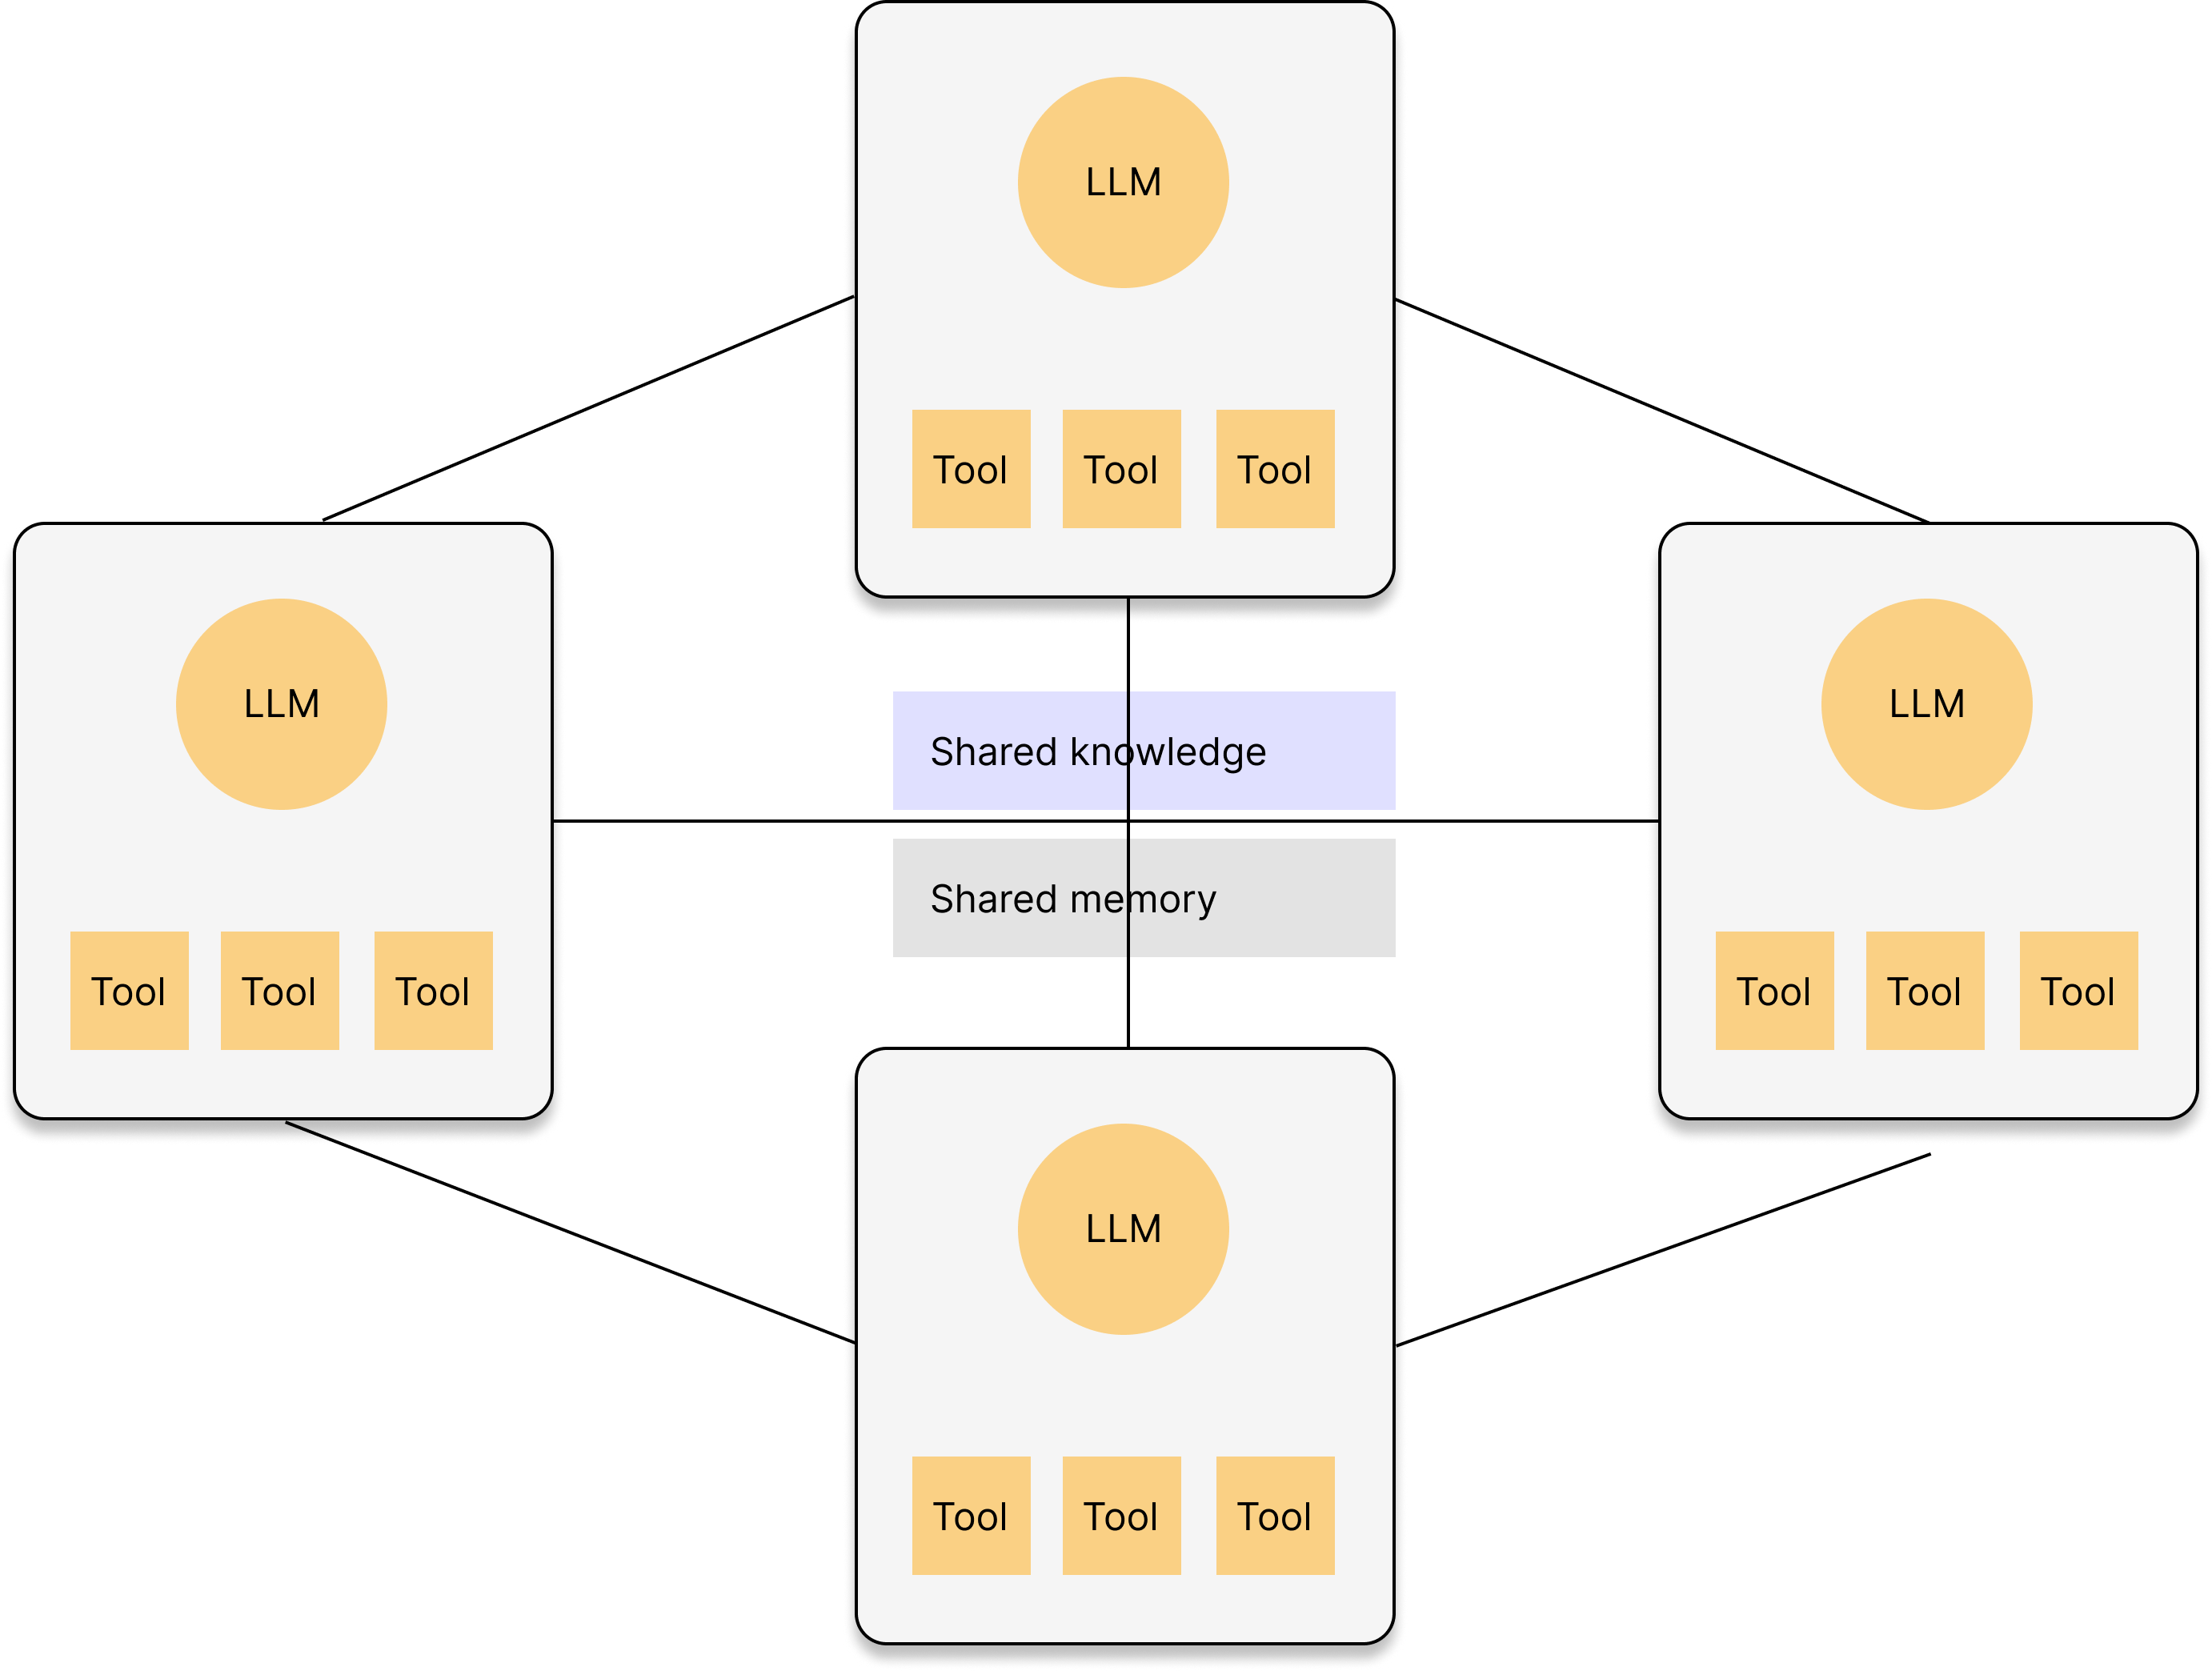
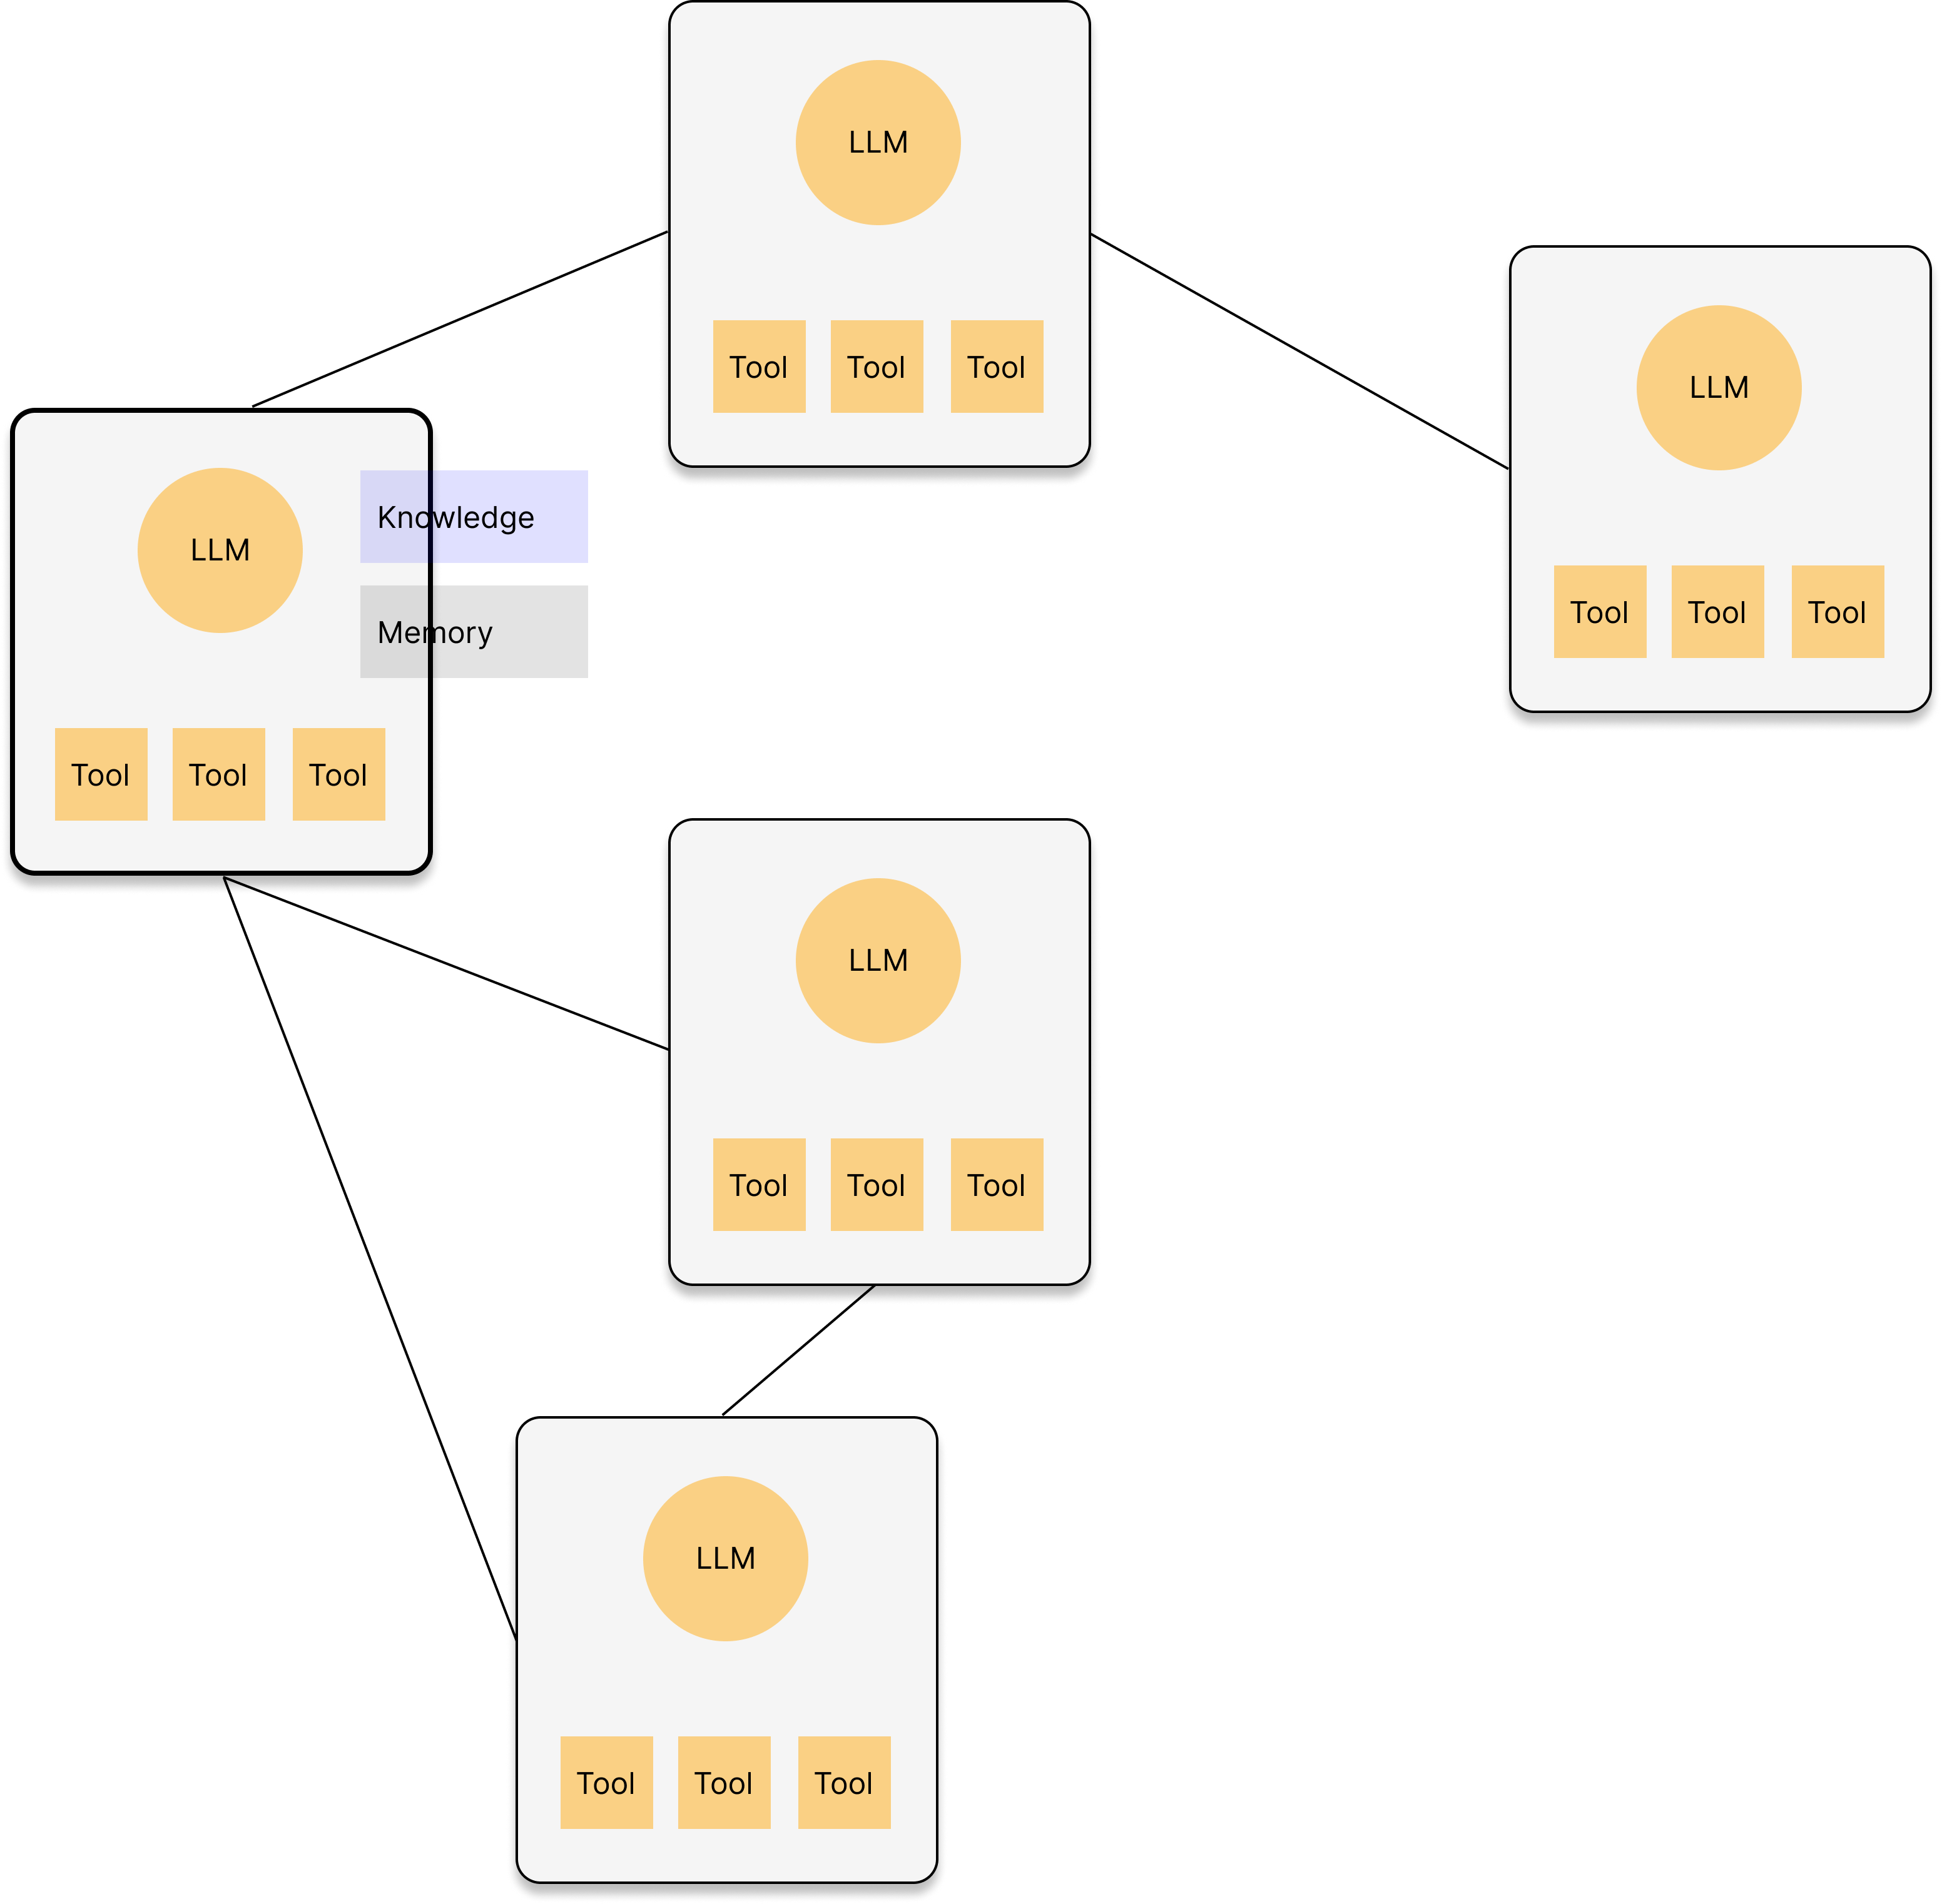
Agents adapt their formation based on task complexity.
You can specify a desired formation or allow the agents to determine it autonomously (default).
| Solo Agent | Supervising | Squad | Random | |
|---|---|---|---|---|
| Formation | 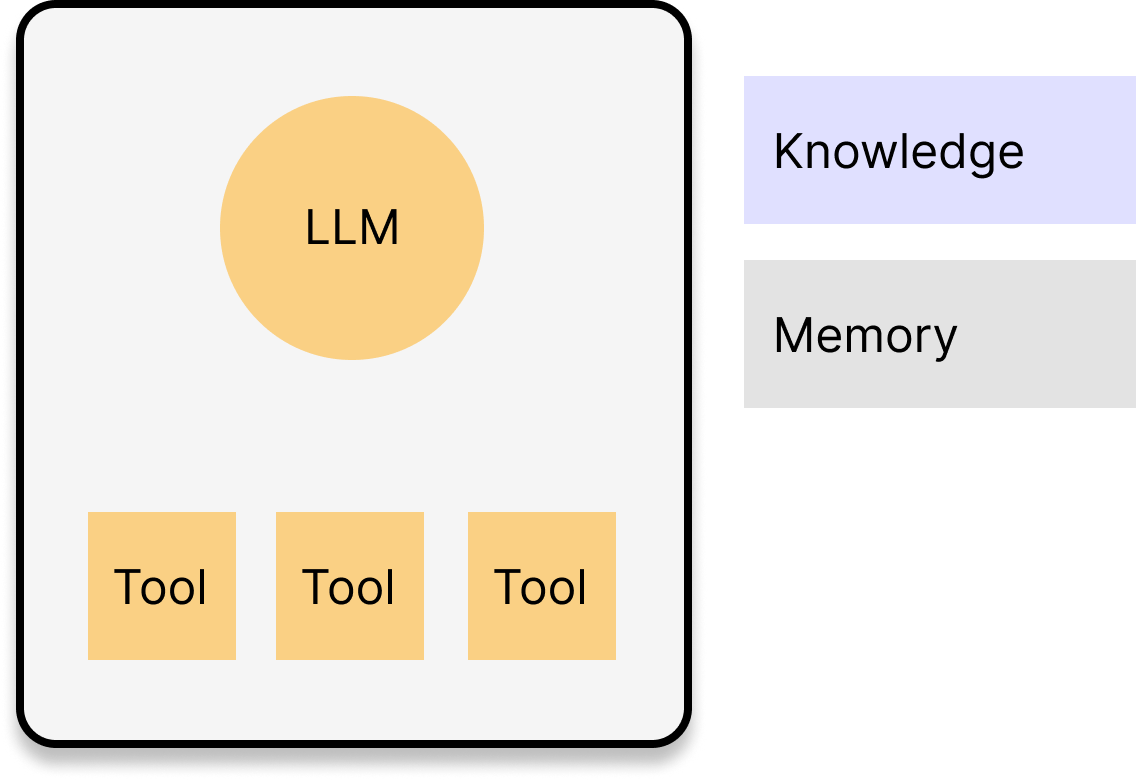 |
 |
 |
 |
| Usage |
|
|
|
|
| Use case | An email agent drafts promo message for the given audience. | The leader agent strategizes an outbound campaign plan and assigns components such as media mix or message creation to subordinate agents. | An email agent and social media agent share the product knowledge and deploy multi-channel outbound campaign. | 1. An email agent drafts promo message for the given audience, asking insights on tones from other email agents which oversee other clusters. 2. An agent calls the external agent to deploy the campaign. |
Graph Theory Concept
To completely automate task workflows, agents will build a task-oriented network by generating nodes that represent tasks and connecting them with dependency-defining edges.
Each node is triggered by specific events and executed by an assigned agent once all dependencies are met.
While the network automatically reconfigures itself, you retain the ability to direct the agents using should_reform variable.
The following code snippet explicitly demonstrates the TaskGraph and its visualization, saving the diagram to the uploads directory.
import versionhq as vhq

task_graph = vhq.TaskGraph(directed=False, should_reform=True) # triggering auto formation

task_a = vhq.Task(description="Research Topic")
task_b = vhq.Task(description="Outline Post")
task_c = vhq.Task(description="Write First Draft")

node_a = task_graph.add_task(task=task_a)
node_b = task_graph.add_task(task=task_b)
node_c = task_graph.add_task(task=task_c)

task_graph.add_dependency(
   node_a.identifier, node_b.identifier,
   dependency_type=vhq.DependencyType.FINISH_TO_START, weight=5, description="B depends on A"
)
task_graph.add_dependency(
   node_a.identifier, node_c.identifier,
   dependency_type=vhq.DependencyType.FINISH_TO_FINISH, lag=1, required=False, weight=3
)

# To visualize the graph:
task_graph.visualize()

# To start executing nodes:
latest_output, outputs = task_graph.activate()

assert isinstance(last_task_output, vhq.TaskOutput)
assert [k in task_graph.nodes.keys() and v and isinstance(v, vhq.TaskOutput) for k, v in outputs.items()]
Task Graph
A TaskGraph represents tasks as nodes and their execution dependencies as edges, automating rule-based execution.
Agent Networks can handle TaskGraph objects by optimizing their formations.
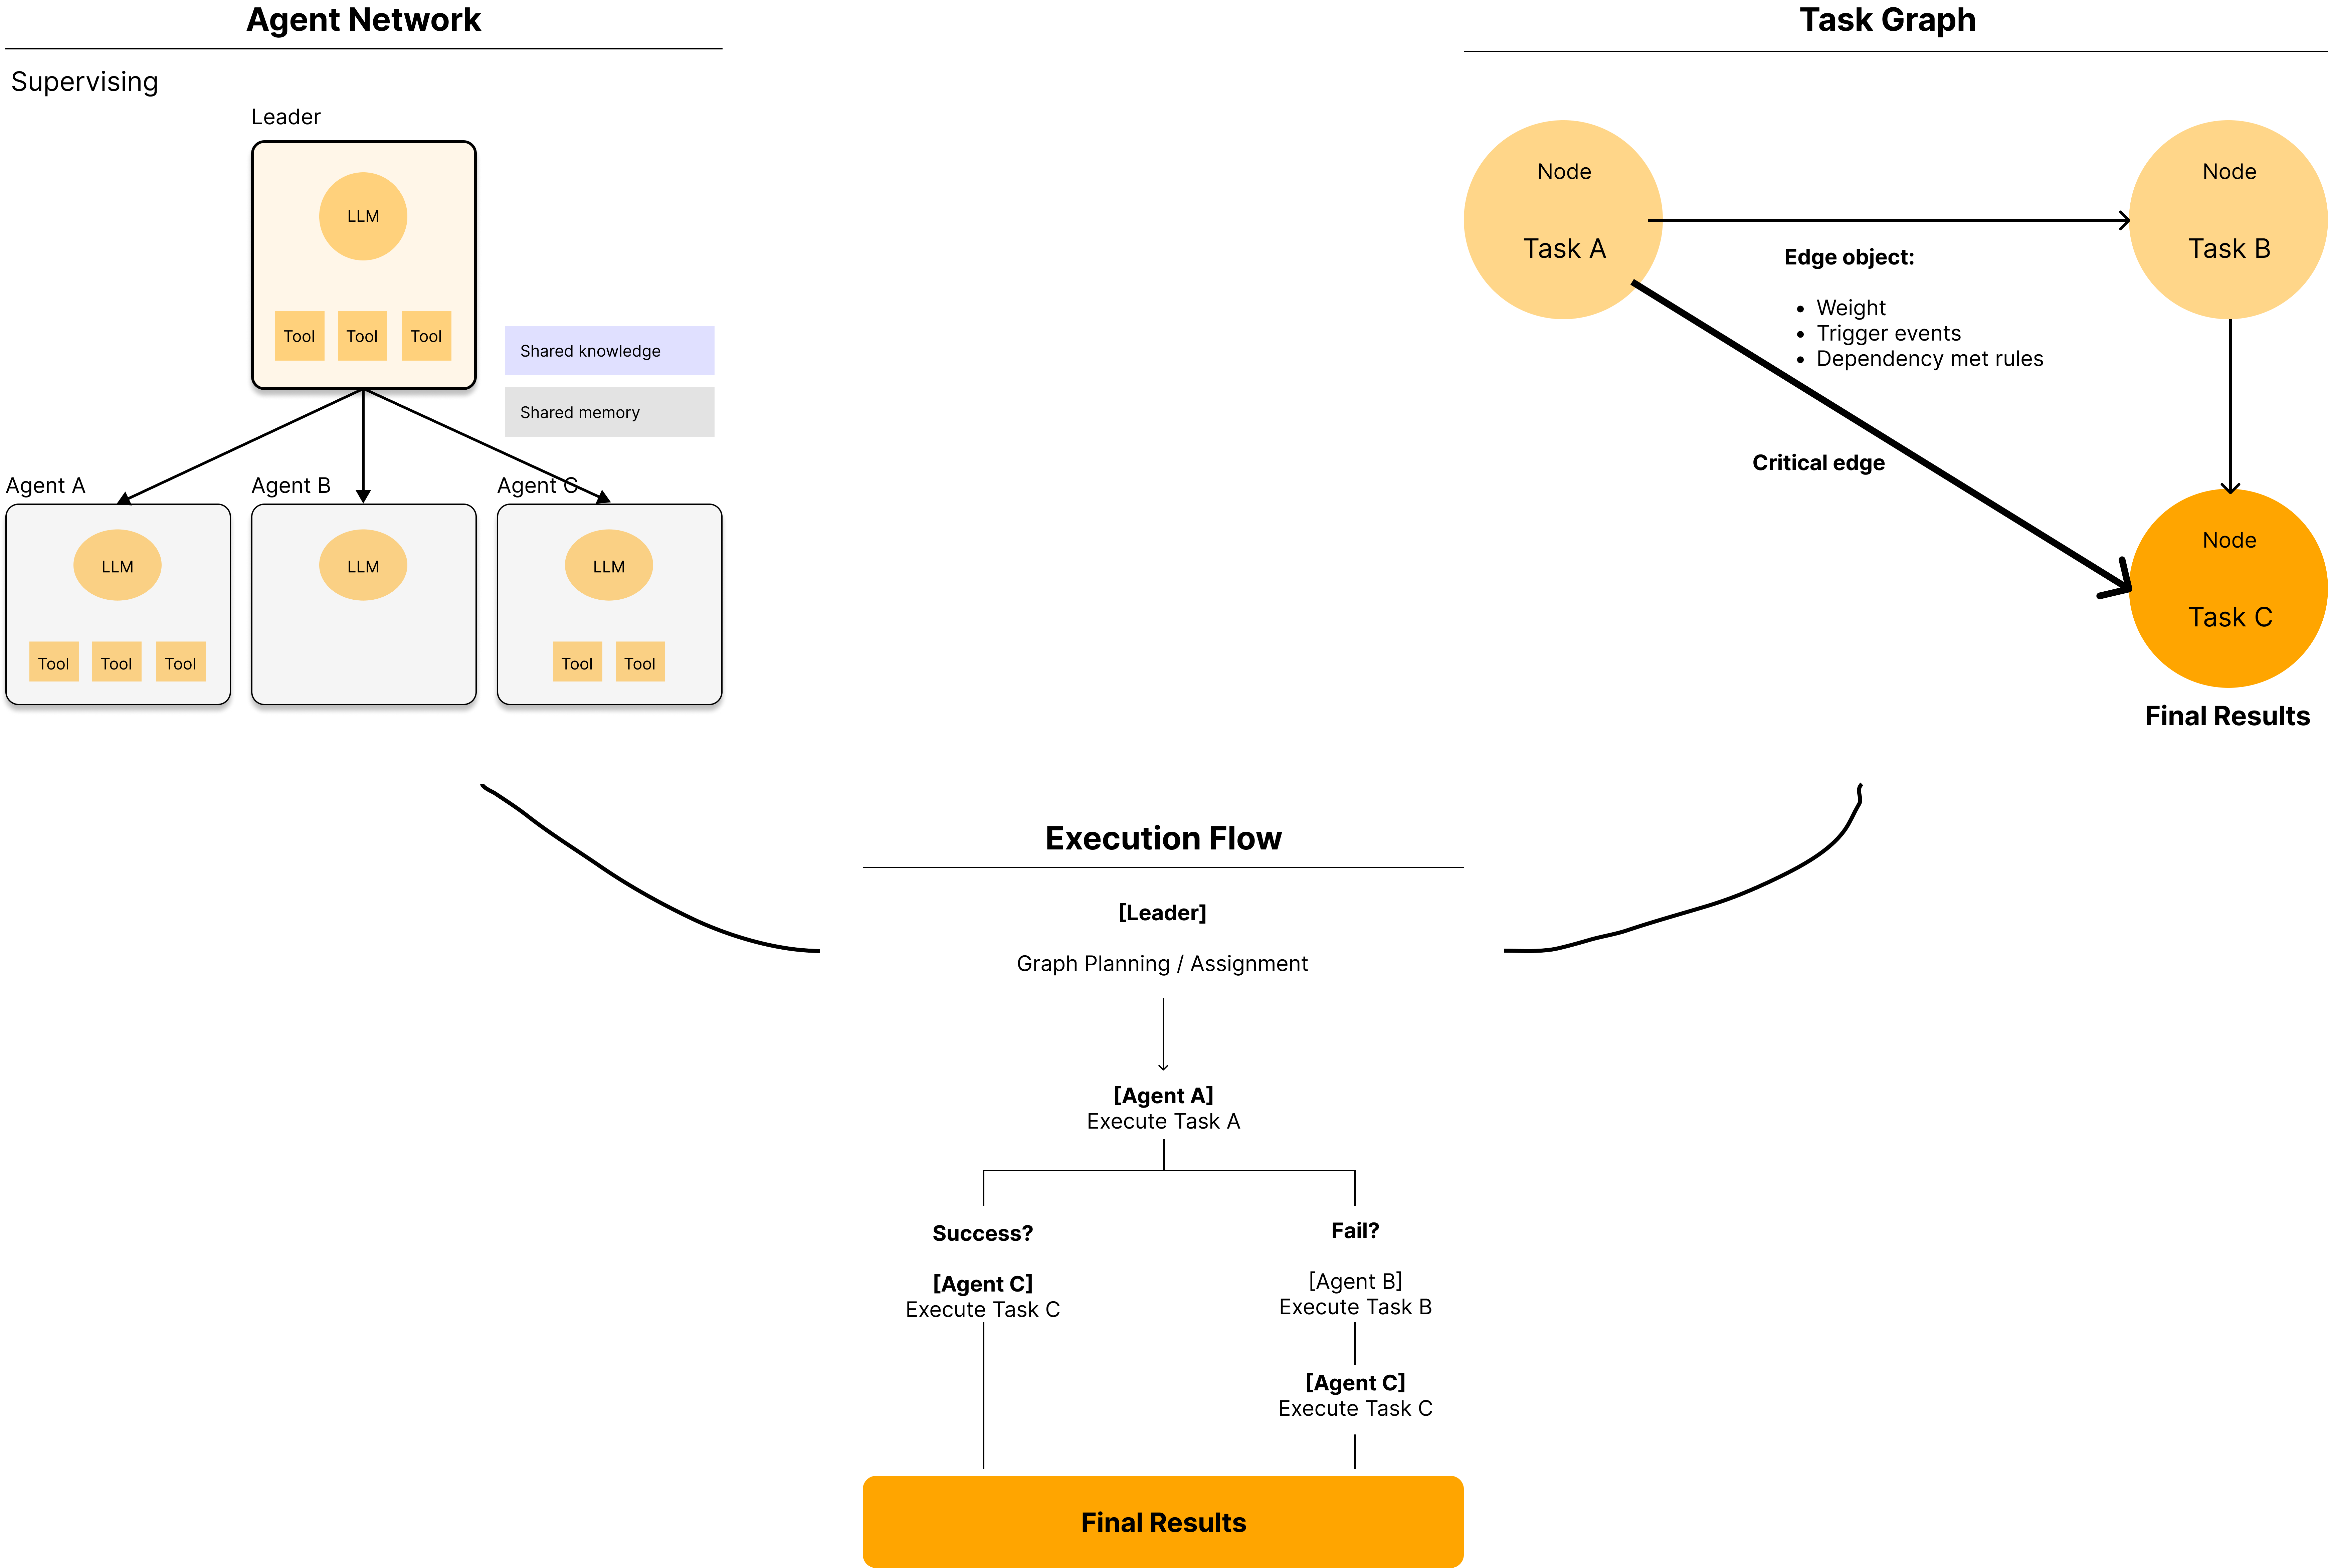
- Ref: TaskGraph class
Optimization
Autonomous agents are model-agnostic and can leverage their own and their peers' knowledge sources, memories, and tools.
Agents are optimized during network formation, but customization is possible before or after.
The following code snippet demonstrates agent customization:
import versionhq as vhq

agent = vhq.Agent(role="Marketing Analyst")

# update the agent
agent.update(
   llm="gemini-2.0", # updating LLM (Valid llm_config will be inherited to the new LLM.)
   tools=[vhq.Tool(func=lambda x: x)], # adding tools
   max_rpm=3,
   knowledge_sources=["<KC1>", "<KS2>"], # adding knowledge sources. This will trigger the storage creation.
   memory_config={"user_id": "0001"}, # adding memories
   dummy="I am dummy" # <- invalid field will be automatically ignored
)
Project Set Up
Installing package manager
For MacOS:
For Ubuntu/Debian:
Installing dependencies
-
AssertionError/module mismatch errors: Set up default Python version using
.pyenv -
pygraphvizrelated errors: Run the following commands:brew install graphviz uv pip install --config-settings="--global-option=build_ext" \ --config-settings="--global-option=-I$(brew --prefix graphviz)/include/" \ --config-settings="--global-option=-L$(brew --prefix graphviz)/lib/" \ pygraphviz- If the error continues, skip pygraphviz installation by:
Setting up a local env file
Create .env file at the root of the project directry and add your keys following .env.sample.
Technologies Used
Schema, Data Validation
-
Pydantic: Data validation and serialization library for Python.
-
Upstage: Document processer for ML tasks. (Use
Document Parser APIto extract data from documents) -
Docling: Document parsing
Workflow, Task Graph
-
NetworkX: A Python package to analyze, create, and manipulate complex graph networks.
-
Matplotlib: For graph visualization.
-
Graphviz: For graph visualization.
LLM Curation
- LiteLLM: LLM orchestration platform
Tools
- Composio: Conect RAG agents with external tools, Apps, and APIs to perform actions and receive triggers. We use tools and RAG tools from Composio toolset.
Storage
-
mem0ai: Agents' memory storage and management.
-
Chroma DB: Vector database for storing and querying usage data.
-
SQLite: C-language library to implements a small SQL database engine.
Deployment
-
uv: Python package installer and resolver
-
pre-commit: Manage and maintain pre-commit hooks
-
setuptools: Build python modules
Trouble Shooting
Common issues and solutions:
-
API key errors: Ensure all API keys in the
.envfile are correct and up to date. Make sure to addload_dotenv()on the top of the python file to apply the latest environment values. -
Database connection issues: Check if the Chroma DB is properly initialized and accessible.
-
Memory errors: If processing large contracts, you may need to increase the available memory for the Python process.
-
Issues related to dependencies:
rm -rf uv.lock,uv cache clean,uv venv, and runuv pip install -r requirements.txt -v. -
Issues related to
torchinstallation: Add optional dependencies byuv add versionhq[torch]. -
Issues related to agents and other systems: Check
.logsdirectory located at the root of the project directory for error messages and stack traces. -
Issues related to
Python quit unexpectedly: Check this stackoverflow article. -
reportMissingImportserror from pyright after installing the package: This might occur when installing new libraries while VSCode is running. Open the command pallete (ctrl + shift + p) and run the Python: Restart language server task.
FAQ
Q. Where can I see if the agent is working?
A. Visit playground.
Contributing
versionhq is a open source project.
Steps
-
Create your feature branch (
git checkout -b feature/your-amazing-feature) -
Create amazing features
-
Add a test funcition to the
testsdirectory and run pytest. -
Add secret values defined in
.github/workflows/run_test.ymlto your Githubrepository secretslocated at settings > secrets & variables > Actions. - Run a following command:
Building a new pytest function
- Files added to the
testsdirectory must end in_test.py. -
Test functions within the files must begin with
test_. -
Update
docsaccordingly. -
Pull the latest version of source code from the main branch (
git pull origin main) *Address conflicts if any. -
Commit your changes (
git add ./git commit -m 'Add your-amazing-feature') -
Push to the branch (
git push origin feature/your-amazing-feature) -
Open a pull request
Optional
-
Flag with
REFINEMEfor any improvements needed andFIXMEfor any errors. -
Playgroundis available athttps://versi0n.io.
Package Management with UV
-
Add a package:
uv add <package> -
Remove a package:
uv remove <package> -
Run a command in the virtual environment:
uv run <command> -
After updating dependencies, update
requirements.txtaccordingly or runuv pip freeze > requirements.txt
Pre-commit Hooks
-
Install pre-commit hooks:
-
Run pre-commit checks manually:
Pre-commit hooks help maintain code quality by running checks for formatting, linting, and other issues before each commit.
- To skip pre-commit hooks
Documentation
-
To edit the documentation, see
docsrepository and edit the respective component. -
We use
mkdocsto update the docs. You can run the doc locally at http://127.0.0.1:8000/:
- To add a new page, update
mkdocs.ymlin the root. Refer to MkDocs documentation for more details.


